Using Microsoft Word, you've created a professional high quality report at work, or a resume if you are looking for a job. It's ready to be published to the target reader. The only problem is, it's full of red (potential spelling mistakes) and green (potential grammar mistakes) squiggly underlines.
Adding all the words that are underlined in red to your dictionary will only affect your own computer. When the document is opened on someone else's computer, those lines will be back and you won't even know it.
Is it possible to get rid of not only the red but also the green squiggly underlines for good? Absolutely. Just follow the simple instructions below.

The first step should always be to spell check and grammar check your document. Make sure Word isn't actually right. Poor spelling (red squiggly underlines) and grammar (green squiggly underlines) can often remove all the credibility you built up in an otherwise very professional looking and sounding documents.
The next steps to follow will depend on the version of Microsoft Word that you are using.
Word 2010 | Word 2007 | Word 2003
Word 2010
 Start by pressing CTRL-A to select your whole document.
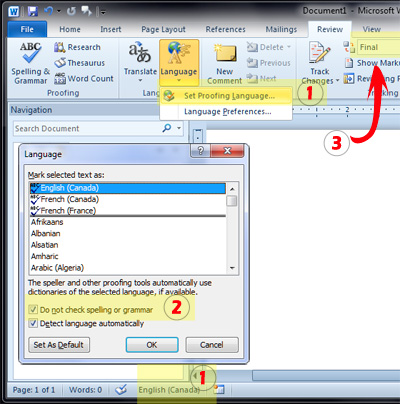
1. Click on the Review tab at the top of the window and then on the Language button. Click on Set Proofing Language…
OR
Click on the name of the language in the status bar at the bottom of the screen.
2. Add a check mark in the Do not check spelling or grammar option and click OK.
All the red and green squiggly underlines should be gone.
3. While you are there, to ensure that the recipient sees things exactly as you do, make sure that you set the document display to Final.
Word 2007
 Start by pressing CTRL-A to select your whole document.
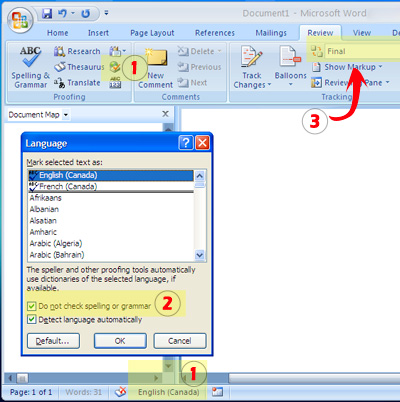
1. Click on the Review tab at the top of the window and then on the Language button. It's the one with a globe and a checkmark in the proofing section.
OR
Click on the name of the language in the status bar at the bottom of the screen.
2. Add a check mark in the Do not check spelling or grammar option and click OK.
That's it. The red and green squiggly underlines should have vanished.
3. While you are there, to ensure that the recipient sees things exactly as you do, make sure that you set the document display to Final.
Word 2003
 Start by pressing CTRL-A to select your whole document.
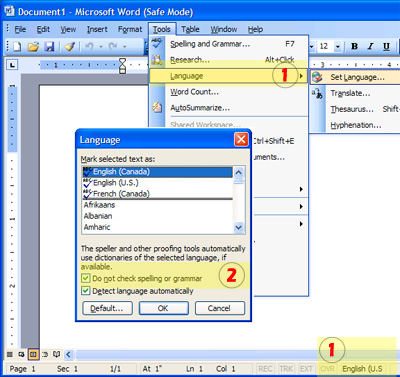
1. Click on the Tools menu at the top of the window, then on Language and then on Set Language…. If you don't see Language in the menu, double-click on the Tools menu to expand the list.
OR
Click on the name of the language in the status bar at the bottom of the screen.
2. Add a check mark in the Do not check spelling or grammar option and click OK.
There shouln't be any red or green squiggly underlines left.
January 5, 2015 at 2:53 PM
Thanks for your valuable info
February 24, 2015 at 12:37 PM
hasn’t made a single bit of difference.
im in the middle of writing a 60 page document to a quick deadline and everything started appearing in red writing with a line down the side too and ive tried EVERYTHING to get it stopped. ugh!
February 24, 2015 at 1:05 PM
Hi Rachael, sorry to hear that you are having difficulty with your document.
What you are experiencing is not a problem with the grammar/spell check. Your document is actually in revision tracking mode.
This is a useful feature when you want to track changes someone is making to your document.
If your teacher/employer/client has asked you to make revisions to your work, he/she may have turned on this tracking mode so that changes can be easily identified without having to review the whole document again.
You have a couple of options:
One is that you could tell Word to just display the final version of your document without displaying where all the changes are. Revision tracking will continue to track your changes if that is useful to you.
The other option is to turn revision tracking off completely – especially if it might have been turned on by accident.
You’ll find all the revision tracking options in Word 2007 and 2010 in the “Review” tab. The section is called “Tracking”. I believe it is still in the same place in Office 2013 / Office 365.
Hope this helps. Leave another reply here if you need help figuring out the options here.
Best regards,
Michael
March 20, 2019 at 9:17 PM
It seems I have similar problem. I have recent version of word. It is underlines in red color with notices. It was appeared suddenly. I think that I have pushed something. I am trying to remove it. It is impossible. I am not very strong familiar with software. I do not know what to do.
March 10, 2016 at 5:01 AM
how will do spelling check in asp.net c#?
March 25, 2016 at 4:55 PM
I am not sure what you mean. Are you trying to spell check your source code?
May 30, 2016 at 10:07 AM
Hi Michael
I found the information provided useful, however, when I try to change the review tab to ‘final’ to prevent the red lines appearing on the document when being read on other systems, I do not have that option. My version of windows shows available choices of ‘Simple, All or No Markup and Original’. The language I am using is English UK. Any thoughts?
July 11, 2016 at 4:08 AM
Hi Jay,
Thank you for your question. What version of Word are you using? Options may have changed in more recent versions of Word.
In any case, if you don’t want the red or green underlines to appear in the document when read on other systems, you will need to:
Hope this helps.
Cheers,
Michael
June 26, 2016 at 7:31 PM
I type quickly and read as I type. As I am typing I misspell a word and I see the red underline show up on the misspelled word. Now I am about 4 words past the misspelling. I use the backspace key to get back to correct the misspelling. Now I correct the misspelling and as I continue to type everything is now being underlined in red. The problem doesn’t usually happen in the first few sentences but usually after three or more sentences. Once I backspace to remove the underline, then continue typing, the red underline is there. I will remain there for the rest of the document. It could be another paragraph or another chapter. Once there the red line does not go off.
July 11, 2016 at 3:57 AM
Hi Sherry,
Sounds like Word is changing its dictionary language on you. When this happens, notice the language in the status bar at the bottom of the screen. If it is showing the wrong language, Word is spell checking your text in a different language which would of course result in it showing all of the text as having incorrect spelling.
To fix the problem with existing text, select the red-underlined text and then click on the language in the status bar. A dialogue box will show up prompting you to select the correct language.
In my many years of experience in dealing with similar situations in a multilingual environment, this type of scenario typically happen for two reasons in Word:
Hope this helps.
Best regards,
Michael
June 4, 2017 at 2:36 PM
In 2003, your prescription doesn’t work. But Tools, Options, Spelling & Grammar, Hide Spelling Errors – that does the trick.
February 1, 2018 at 3:58 AM
Hi Reid,
Just so that you are aware…
The problem with your trick is that it will only hide the spelling and grammar errors on your computer. They will all re-appear when someone opens the document on another computer because they won’t have changed those same settings.
July 30, 2017 at 7:54 PM
it was helpful I did it in few seconds
November 21, 2017 at 3:03 PM
I am working in 2016 Word and none of the suggestions here work:
. There is no ‘Final’ under ‘Review’ to check;
. English (US) is set as default and no others added;
. There is no ‘language indicator’ in document status bar;
. It clearly thinks I’ve changed languages, but it spell checks in English (US),
want this function to continue so am unsure about deselecting in ‘File’
HELP!
February 1, 2018 at 3:55 AM
Hi Cate,
Thank you for your question.
With regards to Final, in Word 2016, the default is “All Markup”. Instead of “Final”, the option is now called “No Markup”.
If you only see English (US) but want other languages, you will need to add a language or set language preferences in Office. Use that link to get more information on how to do that.
As for the document status bar, if the language indicator still doesn’t show up after adding languages, you can add it by right-clicking on the status bar and selecting “Language” from the list of options that will popup. There should be a check mark beside it when enabled.
Hope this helps. Best regards,
Michael
August 21, 2018 at 3:51 PM
I am able to find and check the box for “Do not check spelling or grammar.” but but clicking on it doesn’t lead to any change. I check the box, it adds the check in the box, click OK, but nothing happens, and the box is unchecked when I open it again.
December 5, 2018 at 4:54 PM
This does not work for me (in Word Professional Pro 2010). I’d love to find a fix, but I am not overly optimistic.
November 17, 2020 at 12:09 PM
I have been looking for this Microsoft Word article since long time. Thanks author.
February 16, 2021 at 12:34 PM
thank you very much
March 27, 2022 at 10:39 AM
I had the exact same problem; nothing fixed it. Everything was properly checked, but the problem persisted. I tried the following for the heck of it and it worked. Select all text, open the Review tab, click on “set language.” A menu box will appear; in mine, the proper language was checked. However, at the bottom of this box is a “default” button. Click on that, and your language will reset and the problem should go away. I guess somehow the language becomes invalid even though checked. YMMV, but it worked for me.
July 8, 2022 at 4:56 PM
Hello,
I’m using MS Office 365. I type documents in various Indian language scripts interspersed with English. The first 2 methods did NOT work for me:
1> Review –> Language –> Set Proofing Language –> Do not check spelling or grammar (And no matter what ‘Proofing Language’ I set, the red underlines did not go away. )
2> Review –> No Markup
3> I didn’t find ‘Tools’ or ‘Options’ anywhere in Word (Except for the following twisted route)
———————————————————-
But by trial I found this following method that DID work:
Review –> Language –> Language Preferences –> go to ‘Proofing’ tab
Uncheck the 2 checkboxes:
“Check spelling as you type”
and
“Mark grammar errors as you type”
Problem solved! (At least for me)
January 22, 2023 at 3:07 PM
Thanks for sharing Shruthi!
April 6, 2024 at 3:35 AM
Thanks for help. It’s works!